Showing posts with label Pinterest. Show all posts

Wednesday, July 18, 2012

Zero Cost Makeover

I rearrange my furniture a lot. Like it might be an illness. You should never walk around my house at night without a light. Things are NOT where they used to be.

After many wasted hours looking on Pinterest  I decided I needed some bookshelves. I have avoided bookshelves for years because they just hold stuff I have to dust. I'm more of a 'closed storage' girl. But, I realized I needed height along my super tall wall and bookshelves were the only answer I hadn't tried. 

I checked out some retail sites for a baseline price. I love garage sales but furniture goes FAST. So, I thought Craigslist might be an option. I scanned the local listings for two days and found very little. Then on a whim I decided to look in the free section, figuring it would be total junk. Lo, and behold, someone just a few miles away from us had listed FREE bookshelves. I looked at the posting time....20 minutes ago! I threw Everett in the car and we got them! Here are my beautiful free shelves!


Problem: I had NO idea what to do with them! I had never worked with shelf arranging. I sat and looked at them empty for a few days. Then I couldn't take it and went through the house looking for bookshelf worthy items. Below is my pathetic attempt at shelf arranging. It's...fine....ok....a little bland.


Fortunately for me, I recently made a new friend and it turns out she LOVES to do stuff like rearrange furniture and organize stuff on shelves. I asked her to help me! And, you know what? She did! It looks WAY better now. You can see for yourself below. She actually pretty much rearranged my whole house. She likes to do it as much as I do. We were giddy. :D


I have some more tweaks to make. Like, you know, actually hang pictures. But, it was so fun and everything we did so far was zero cost (not zero work, I worked up a good sweat several times). She had some suggestions for purchases but those can all wait till the budget allows. I am enjoying my zero cost makeover!

What has been your best free/cheap find? 

Wednesday, May 16, 2012

Lara Bar Love

When I tried Lara Bars many years ago I thought they were gross. That was before I did Jorge Cruise's Belly Fat Cure and learned to live with less sugar in my life. I totally credit his diet with teaching me that fruit really IS sweet and is also in the category of desserts as far as how much we should have. So, when I tried Lara Bars again recently as I began to explore the 100 Days of Real Food blog I thought they were FAN-tastic.

Then I thought, I bet I can make these myself. (Which is very Eric of me!) I started with this post which I found on Pinterest which has lots of great variations and recipes. However, following her instructions exactly left me with kind of a dry crumbly bar.

I decided to venture out on my own. After all, it's TWO ingredients. I could hardly mess it up too bad :D

Here is the way I did it. Eric declared that my Lara Bars were 'spot on'. It's so easy. I hope you will give it a try. The two ingredients you will need are pitted whole dates and cashews. (This is the basic bar, see the Pinterest post for ideas on how to change it up)


First put the cashews in the food processor and process until MOST of the nuts are very very fine and just a few are less than pea size. Kind of just before all of it is nut flour. I then emptied the nuts right back into the container and without washing the processor added the dates.

With the dates in the food processor (I dumped in the whole bag) process while gradually streaming in 1 to 2 Tablespoons of water. Process until the dates begin to clump up on the side and have a very thick brownie batter consistency.


I added all the dates I had processed into another bowl and gradually added the nuts, mixing with my fingers till I felt the dates had accepted the right amount of nuts. (I did NOT end up using all the nuts)


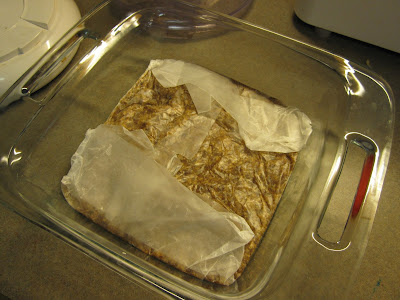
I lined a 9x9 pan with wax paper and pressed the mixture out flat and relatively smooth (these ARE homemade after all hehehehehe) then I popped them in the fridge.


I left them overnight to chill and then I unwrapped them and cut them up. I get 10 bars from this method. I'm thinking I ended up with at LEAST 4 extra bars for the same cost with this method (and I still have some nuts left for next time).


I was really pleased with the texture this time and I think that pulsing the nuts a bit more than last time and adding the water was the key to this.


To store the bars I just wrapped them back up in the same wax paper. Wrapping each bar semi-individually so the wouldn't stick together and put them in a smaller container for the fridge (I put the lid on after I took this pic). You could also store them in snack size ziplocks to pack in lunches.


Enjoy them. They are DE-licious and so so so easy!

Saturday, May 12, 2012

Trash to Treasure

Here are some things you need to know about me:
I resale shop
I garage sale shop
I will even 'free-cycle' (this is just fancy for pull over and take something out of your trash)

Here is today's find- outdoor chairs! Yes, they were dirty, sun damaged, and had that powdery feel as a result but, otherwise, they were in great shape. No cracks or structural fatigue. BINGO!


 I went right over to Ace Hardware and picked up some of this Krylon Fusion spray for plastics that's all over the pinterest/blog scene. I liked that it said "No sanding or priming". I chose a soft buttery yellow since they didn't have turquoise (my first choice).


 But, first, a cleaning was in order. Pulled out the 'Jet' setting on the old hose and gave them the once over.


 The Krylon did turn the chair yellow. But, it was kinda a matte/satin and a bit TOO pale. Now it just looked like the sun had turned the chairs a nasty powdery yellow (see below- left). NOT what I was going for. I headed over to HD and tried another brand. This time Rust-Oleum and chose a warm yellow in glossy (chair below- right, half finished so you can actually see the original dirty white on the seat also).


The Rust-Oleum is much brighter without being neon. Also, the glossy was still not a slick finish. I guess I'd have to put a clear top coat on or at least another coat of the paint to get there.


But, I'm happy with how they look now. Sunny, yellow, and brand new!


Wednesday, April 11, 2012

I Love Paris in the Springtime

I found a picture in an old magazine with plans for this trellis. As usual, I turned to Eric and said 'Can you make me this?!' and he said 'Probably' (Understand that, with Eric, that is as close as you get to a yes if it's an 'action question').

Some time went by as other things got higher billing on the project list. But, before I knew it, we were at the Home Depot buying the wood. I got a little excited.
Then, more time went by as still MORE projects took priority. I wonder if Eric could be sabotaging the vehicles just to put off my project? Hahahahaha!

One day I arrived home to the sound of woodcutting. Construction had begun! After that it wasn't long at all before I had this beautiful trellis out back!


My plant (this is a Rangoon Creeper) was excited too! See how it is already reaching out for it's trellis?

After moving my plant from it's too small pot into the ground I sat with Shasta on the bench and just enjoyed my new trellis. That's when I realized it kinda looked like the Eiffel Tower. I had not thought of that before but it might explain why I was so enamored with it from the first time I saw the picture. I kind of have a thing about Paris and the Eiffel Tower. I like them ALOT! :D Now I have my own little eiffel tower and soon my Rangoon Creeper will be creeping up and blooming.

It makes me happy every time I see it! Didn't Eric do a GREAT job?! He totally loves me! I should have called this post: I love ERIC in the springtime!


Saturday, February 4, 2012

Hello 2012 & Glazed Donut Muffins

Well HELLO!

 I don't know if anyone is still out there reading this little old blog but I am back. Where were you, Tracie? Well, I will confess...I have, let's say, a bit of trouble handling December due to my anxiety issues. Although, sadly, it took me a few YEARS to figure out what the root problem really was and get it under some sort of control. Each year is getting easier (at least in my opinion hahahahaha! I guess you would have to ask my husband and kids if it's really true). But, I feel that a year without overwhelming sadness, or an ER visit due to a migraine is progress and I will take it!

Well, Tracie, that's all fine, but, um......did you know it's February? Why, yes I did. Truth is, I need January to recover from December. Last year I needed till April to recover from December so I feel pretty good about only needing ONE month this year.

Now disclaimer here: You might wonder what the HECK goes on in December to mess me up so bad. You may think I have the family or the in-laws from HELL but let me assure you they are all the salt of the Earth and it just isn't so. What it boils down to is me. It wouldn't really matter WHAT happened to me in December. I just work myself up (not on purpose) and then FIND something to latch onto and freak out about. Some have suggested I get away from it all in December, skip Christmas, and just head for the islands. But, the truth is the problem with that plan is that my mind would still be there with me making me crazy over the weather, or the room, or a cocktail gone wrong or SOMETHING. I would FIND something. So, unless I can go away and leave ME here that plan won't work either :)

It's just the way I am. And I'm working on it. And that's all I can do. And of course blog about it. I can do THAT :D Hehehehehe. Aren't you glad I'm back?


MOVING ON :)

This post is supposed to be about my Glazed Donut Muffins. But, let me just clairify they are not MY Glazed Donut Muffins, they are from My Baking Addiction and I found them via Pinterest where they were MISlabeled 'Krispy Kreme Donut Muffins' (not by Ms. Baking Addiction, just by some random Pinterest-er).

My take: They ARE yummy! I followed Ms. Baking Addiction's instructions and they turned out just as she said they would all awesome and puffy! However, they are NOT like Krispy Kremes. They are like super fresh, moist, and tasty cake donuts with a glaze. I would definately make them for a breakfast or brunch. They are not too sweet but just sweet enough with the usual hearty and salty breakfast fare. (or in our case for a late night snack since I made them tonight for Sunday School class tomorrow).

I hope that if you NEVER wish to attempt making/frying up actual donuts at home (I have always thought 'WHY when there is Shipley's like EVERYWHERE??') then you will whip up a batch of THESE delightful muffins.

Pros: easy, no weird ingredients, feels like a dessert with being TOO sweet like a cupcake, and finally-- makes a  single 12 muffin batch so even if you go insane and eat them all the damage in minimized :)

Do you like my photo??? I am so pleased with it. This is the first time I have played around in Photoshop with one of my own photos and I really like it. (Please feel free to slather on the praise and encouragement)

I'll be seeing you soon...I mean I have like TWO months of stuff to talk about people!! :)


Wednesday, September 21, 2011

I Can Paint!


Here is the project update I promised you previously. This is another Pinterest inspiration post. Let me begin by saying that Eric chose the tile in this bathroom when we built the house. It has been plaguing me from that day forward.....until NOW! You see, it is one of those patterns that has various tiles in the set. There are basically four different tiles, each with a different color (a slate, a goldish, a pinkish, a gray). Do you KNOW what it has been like to try to choose a wall color or a towel color to go with these?? 

It's the darn undertones...nothing I liked looked good. Here is what would happen. I would pick a color I thought was clearly a neutral brown or gray at the store. I would get home and it would be totally green? or pink? or peach? I'm telling you; it's the darn undertones. I take no leave of them, I send no compliments to their mothers! (Sorry, I had a Pride and Prejudice moment there)

I just lived with nice builder white for several years. Then one day I couldn't take it. I just grabbed the color we had the most of in the house, a peachy beige from the living room and had at it (that's the top/before picture). It was a change. I don't know if it was ever an improvement. It was just something else to look at. Have you ever just NOT been able to look at builder white a moment longer? Well, I knew the color was still wrong but I didn't know how to fix it. 

Then one day I was standing in the shower when I noticed that whatever random body wash mesh sponge thingy (I'm sure that's the technical name) I had was looking REAL nice with the tile. I let some time pass but each time I took a shower I thought 'I think this might make a good wall color in here'. Then my mesh sponge thingy and I took a trip to Home Depot. (BTW, don't you LOVE those new HUGE color cards they have now, like the size of 4x6 photos?? They really help). The winner was Mid Day Mocha from Glidden. It is a gray with purple undertones (purple, it was a purple undertone I needed. Ah HA! Gonna beat you now demon tile!)

Then I had to wait....wait....wait for the Labor Day rebate sale (you DO know that most major holidays you can get a $5 rebate on your gallon paint purchase at the old HD, right?) Now, the hard part. I have never painted a room. I mean, I HAVE helped. I have cut in or moved drop cloths or ya know, directed (when I was pregnant) but Eric has always done the bulk of the work. This time he was occupied with one of his freelance jobs so it was all up to me. And I am happy to say two things: 
1) I can paint a room! 
2) I LOVE the color (and Eric does too). 

This makes me happy! Have you painted anything recently? What is your process? 

Saturday, September 17, 2011

Money Jars

I am trying NOT to get totally lost on Pinterest! Ya know? So, I have made up my mind to try something off my boards every week. I have another project that I will update you on soon. But, this was a quick one that I had really needed to do for awhile.

We just started giving the kids allowance and letting them handle their own birthday money. I was carrying all their money in little wallets in my purse but that meant that every penny they had (except their church quarters) got spent EVERY week.

We wanted them to do some saving up for things that cost more than a dollar. But, with me having it all with me at all times, it was hard to make them do the 'one week wait to make a big purchase' thing we were trying to implement. (I should note here that this would be a good thing for ME to implement too Hahahahahaha. We are trying to raise kids somewhere between the way Eric and I spend which is basically that he never does and I'm the impulse spender!)

So, you can see from the pic that I finally made them their little savings jars. Now they can see their savings and it's easy for them to open and count it which they LOVE to do. It's a nice alternative to a piggy bank because I can even stick a gift card in the wide mouth jar. I just used some stickers and some stamps/markers. The jars are left over and washed out from some salsa.

What are you actually DOING with your Pinterest?

Tuesday, August 30, 2011

Broccoli Pin


Are you on Pinterest? Oh my, If you are not then pretend I didn't mention it...close this page...resist the dark side.
If you ARE using Pinterest you know that what happens is that you pin a ton of good intentions, brilliant ideas, MUST do thats... and then close up the computer and walk away. Hahahahahaha.
Well, I am DETERMINED to actually use some of these and I have tried two so far. The score is Fail-1, Success-1.
My fail was a homemade tea latte that just tasted terrible! So, I did a little more research on my second pin (labeled Best Broccoli of Your Life) and found out it was actually a Barefoot Contessa recipe. LOVE her! So with only mild anxiety I gathered the ingredients and gave it a try and guess what-- it was great!
Eric said it was a 'keep' recipe and Evie liked it except for the lemon juice at the end (I SHOULD have thought of that) so next time I will just set some aside before I add that at the end.
Notes: I did not use the pine nuts or the basil. Just didn't want to invest in a 1st try recipe...figured we would know without those two if it was a keeper or not based on the comments/reviews. Also, since I only used ONE head of broccoli (again not investing yet) I did mine in the toaster oven and it turned out great. (LOVE not turning on the big oven!)
Have you tried any of your Pinterest pins? Was it a success or total fail? Are you addicted to Pinterest?

Photo from here